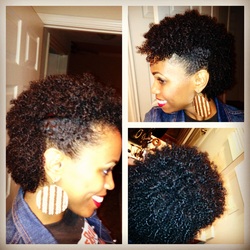
 It is no secret that my favorite natural hair style to date is the twist out because of its versatility and longevity. I am always trying to find new ways to style a twist out, whether its fresh or a few days old. My favorite characteristic of a twist out is its ability to elongate my hair. The twist out that I am about to share with you gave me the most stretching I have experienced to date!! My hair looked closer to its true length and it was super defined. Before doing this twist out, I used the LOC (liquid, oil, cream) Method to ensure that my hair retained the oils and moisture that I put in it. Check out the video below to see how I achieved this look. 
1 Comment
 After doing a two conditioner co-wash (see blog post for details). I deep conditioned my hair with Eden Bodyworks All Natural Deep Conditioner. I followed this with the LOC method using Jane Carter Solution Revitalizing Leave-in Conditioner, lavender oil/water (for detangling), jojoba oil and Camille Rose Curlade Moisturizing Butter. Once my hair was detangled, I followed the steps below to complete a flat twist out. 1. Divide your freshly co-washed or shampooed and conditioned hair into four sections using clips. Make sure the front section is parted the way you like wearing your hair. 2. Starting from the bottom section take either 1/4 or 1/3 of the section (depending on your hair thickness) and finger detangle, shower comb detangle and denman brush detangle the section. (Feel free to add oil and water to aid in the detangling process. Remember to detangle from the ends to the root. Be careful!) 3. Work a generous amount of your favorite curl cream (Curlcare Soft Hold Cream) through the section. 4. Begin your flat twist with a small two-strand twist and continue to add hair to your flat twist all the way to the end of the section. 5. Either roll the end of the twist around your finger or roll the end of the twist with a flexi rod. 6. Repeat this process until you are done. Allow your hair to air dry overnight or use a hooded dryer. 7. Take the twists down VERY slowly using your oil of choice on your fingers. I used jojoba oil. It is important to take the twists down slowly to avoid frizziness. Think of taking your twists down as gradually and gently unraveling them. The flat twist out takes about half the time that it takes me to do a normal twist out! This excites me so much because it normally takes me at least an hour to do a regular twist out. My hair turned out to be a great deal more defined than a regular twist out and the curl pattern was a lot different. If you love twist outs as much as I do, you will love the flat twist out even more!! Its a nice change in my usual curl pattern and my hair was more stretched than normal. The only catch to using this method is that the drying time is considerably longer. Air drying took me about 10-12 hours or overnight. I would do this style the day before I was ready to wear it. You could also consider using a hooded dryer. Good luck! ***When I took my flat twists down, I decided to do a simple updo. I will post a tutorial for this later***  Ever spend your precious time twisting or braiding your natural hair, only to untwist it and it looks like an undefined mass? It happens =(. One of the perks of having natural hair is its ability to be shaped with something as simple as a bobby pin. Spring and summertime weddings are the perfect time to put this to use!! I created this wedding style on a 2 day old twist out I did using Nothing But (brand) Pure Pudding cream. This cream was very light and therefore my twist out was not as defined as usual. This style is perfect for a twist out that did not turn out as defined as you would have liked. Follow the steps below to recreate this easy half-frohawk. 1. Using CurlCare strong hold gel, brush and smooth back the hair on front right side of your head and secure it with small bobby pins. 2. Once the hair is secure, arrange your twisted or curled hair to fall foward to cover or hide the pins. Arrange the rest of the hair from this section to your liking. (I did more separating of the twists and light teasing to make hair bigger) 3. Leave the other side of your twist unsecured and arrange curls to your liking. 5-10 minutes and you're done! How do you save your twist-outs or braid outs that you don't like? Please Share! 
 There's nothing worse than being short on time right before you have somewhere to be. Natural hairstyles require time. You're not going to get a twist out done in under an hour. (If you can, please show me how! lol). With that being said, it is always good to have some quick, but cute styles under your belt for those times when you still want to look want to make your hair look nice, but as quickly as possible. Check out the video tutorial for this quick freaux-hawk done on a wash and go. After co-washing my hair, this style took under 15 minutes to do!! 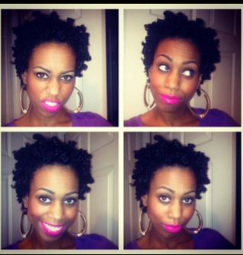 Everybody knows my absolute favorite natural hair style is a twist out because of its great curl definition and versatility. As much as I love twist outs, I decided to try something new and was pleasantly surprised! Bantu knots gave me exceptional curl definition as well as a totally different look that I love. The curls were tighter and just as easy, if not easier, to maintain overnight (don't tell my twist outs I said that lol). To maintain this style, I bantu knotted my hair in large sections using a little water in a spray bottle overnight and was able to wear my bantu knot out for five days! This is definitely a hair style that I will add to my arsenal. Very cute! 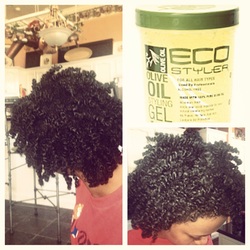 1. Wash and condition hair as normal. 2. Section hair into 4 sections and secure with clips. (This is also the time to part your hair, how you desire. I didn't part my hair, I just twisted in the direction that I wanted my hair to fall.) 3. Work about 2 finger tips amount of virgin coconut oil into the section you are about to twist from root to tip. 4. Depending on how large you want your twists to be, take a section of hair from the main section and spray it with water. 5. Then work the Eco Styler gel though the smaller section and then two strand twist that section to the very end. Don't borrow hair from other sections! ( I know it's tempting, but not doing this really ensures that your twist out is very defined). 6. Repeat steps 4 and 5 until you have two strand twisted all of your hair. 7. Let hair air dry overnight (with silk bonnet) or sit under a hooded dryer. 8. Untwist hair with lemon grass oil. I only untwisted each twist once, for a fuller look you can separate the twists further into 3-4 pieces for each part of the 2 strand twist. BranSouthern Style Naturalista  Want to define the curls in your fro? Try shingling, which is essentially working the product through your hair from root to tip. You can use a comb or your fingers, either way your curl pattern will pop!!! In the video below, I used a curl pudding, but don't be afraid to try other holding creams or moisturizers for your shingling techniques and let me know how they come out! **These initial videos are sometimes not as audible as I would like. These are my first attempts at video editing, they will get better I promise! lol* |
Archives
July 2020
Categories
All
|
 RSS Feed